Wednesday, December 31, 2014

Engage NY Application Problems, A Giveaway, & a SALE!!

Hi All, well this is going to be a busy post, but if you make it to the bottom there's a giveaway and a Sale so hang in there.  I finally got around to posting my Engage NY 2nd Grade Application Problems for Module 4.  They have been done for some time now it just took me awhile to get them all prepped and ready to be posted in my store.  I always forget how long that part actually takes.  I always get excited to post something and start uploading things and then I remember I haven't locked down all the clip art, etc. so I always end up spending way more time sitting at the computer then I expect to.  But now it's finished (Yay!) so here it is:


This new addition to my store is just like my last only it features the application problems for Module 4.  It contains large slides that I use to display the problems on my Activboard.


We always solve the problem multiple ways as a class using the student's different strategies.  For my fast finishers I always challenge them to solve each problem as many different ways as they can so we always have multiple strategies to discuss and share.  It also has student pages that can be used to make student work books.  Each student page has work space, writing lines, and a Read, Draw, Write checklist at the bottom.
GIVEAWAY: If you would like to win a copy of my module 4 Application problems leave a comment and your e-mail address below and I will pick one lucky winner to e-mail the file to for free!

I have found these to be really helpful in my implementation of Engage NY and I hope you do too.  I plan to start working on Module 5 in the next week or so since we will be finishing Module 4 shortly after we return from break so check back soon or follow me so you can grab those when they are ready.  For now visit my store where everything is on sale for the next 2 days! 
As always, Thanks for reading!!!

Tuesday, November 11, 2014

Engage NY Module 3 Application Problems

Has your school jumped on the Engage NY train yet?  At my school we voted as a staff to follow it this year because we were unhappy with the program we were using.  I tested it out a little bit last year and am working my way through the program this year.  I like it but like any program it takes some getting used to.  We're all struggling a bit as we work our way through it but I'm hoping that by next year it won't feel so new and overwhelming.  The hardest part so far has been the pacing.  There are exactly 180 lessons and exactly 180 days of school for us.  Like it's possible to teach a lesson EVERY day ALL school year.  What about the first day of school, or field trips, or holidays, or days they just didn't get it and you want to stop and reteach.
Anyway, I'm not here today to complain about it and tell you everything that is wrong with it, like I said I do like the program, I'm here to share a new product with you.  After searching pinterest and TPT for resources to use with the program I felt underwhelmed by what was out there so I decided to make some of my own.  The first product I have finished is my Engage NY 2nd Grade Application Problems for Module 3.  


I started with module 3 because well that's where we were in the program.  The file contains all of the Engage NY Module 3 Application problems for 2nd grade.  It can be used for displaying on your interactive whiteboard or printed for the students.  When I use it on my activboard I just annotate over the screen so that we can solve it together on the board after the students have worked on the problem in their math journals. I included student work pages that you can copy and assemble as workbooks for your students, or I like to just print the slides in a smaller size for students to cut and glue into their math journals since we had already started using our composition books for that before I made this product. Each page/slide contains the lesson title, application problem from that lesson, as well as blank space at the bottom for solving the problem. I hope you find this product useful, I know it saves me time as I'm preparing for the lessons. I am currently working on Module 4 since we are about to start that and will post it once it's ready. I do plan to do this for all of the modules so if this is something you can use follow me so you'll get the updates when I have added them to my store. :) I am also considering doing this for other grade levels once I have finished with 2nd grade so comment below with your grade level if this is something you could use in your classroom.

As Always Thanks for Reading!

Thursday, October 9, 2014

Classroom Tour 2014

Well, I'm a little late on posting my classroom tour considering that we have already been in school for two months, but that's how it goes at the beginning of the school year.  I posted about my classroom last year, so this year I decided I would just show you the few changes I made.  As usual I had plans for more changes, but well I just ran out of time to get all those cute pinterest ideas done.  The beginning of the school year is about the only time of year that I have time to do those things so it'll probably be next year before I have any major classroom changes and cute pinterest crafts to post about.  This year I really didn't change much.  The first thing I changed was my student work bulletin board I have in my classroom.  I LOVE how it turned out!
I saw an idea on pinterest to spray paint clip boards but they were to expensive.  Instead I laminated large pieces of black construction paper and hot glued on some clothes pins.  Then I added the little name clouds for each student.  I purposely put the names on after I laminated the black paper so that next year I can just change out the names but leave the rest of the bulletin board. 
I had couldn't fit all of the students on to the board so I added some above it so that every student has a spot.  I could have made the board bigger by moving my calendar, but I was a little lazy so I'll save that step for when/if I move classrooms in the future.

The next change I made was to my computer/desk chair.  It broke on me last year, like completely broke to the point that if you sat on it it collapsed and you ended up on the floor.  So I took it home for my husband to fix and while I had it home I decided to give it a little make over.  All I did was buy some cute fabric from Hobby Lobby and cover up the old boring fabric and now I am in LOVE with it.  It is definitely one of my favorite things in my room.


 Well sadly that's about all the cutness I had time for this year.  No major changes to my room but sometimes it's the little things that make all the difference.  Thanks for reading!

Sunday, August 3, 2014

Back to School Sale 2014 + My New Teacher Binder (& A Freebie Too!)

It's here, It's here! The TPT annual back to school sale starts tomorrow!  My entire store will be marked down 20% during the big sale and you can get an additional discount by using the promo code below.  Clicker here to get to my store.


And just in time for the big sale I'm excited to announce that I finished my Teacher Binder Pack.  I just love how it turned out!

Here are some samples of what you can expect when you purchase this product.  This pack includes 16 different bright binder cover sheets to help you create your own teacher binder(s). Each cover sheet includes a binder tab and spine so that you can choose to create one large binder or several smaller binders. To use the binder tabs simply cut out the circles and attach them to the cover sheets to create dividers for your teacher binder.  I haven't gotten to assemble mine yet so I don't have any pictures of the assembled product, but once I get to workin in my classroom this week and can use the color printer at work I'll put mine together and post some pics for ya.  

In addition to my new teacher binder pack I have also recently added a matching 2014-2015 Teacher Calendar to my store.  These go from August 2014-June 2015 and feature bright colors and fun seasonal clip art on each calendar page.  


These 2 new products can both be purchased individually or you can save $1.00 and buy them in together in My Teacher Binder/Calendar Bundle. As an added bonus for buying the bundle the calendar pages will be updated each year at no additional cost!  

I hope you enjoy these new products as much as I do and pick them up during the big sale.  As a thank you for reading my post you can click the pictures below to get a freebie from my new teacher binder pack.


Wednesday, July 23, 2014

Christmas in July: Part 3

For Part 3 of my Christmas in July Sale I will be discounting my #3 best selling item: Sort it Out: An Addition and Subtraction Key Words Word Sort.


Sort it Out: An Addition and Subtraction Key Words Word Sort

I use this word sort to help students learn the key words to look for when solving word problems.  I usually let them sort them in teams and then we go over the words and their meanings as a class.  After we have sorted a few times we make these cute little creatures and glue the key words all over them.  There is no template for these guys (since it's not my original idea) we just make them out of construction paper, but they're really easy to make.  I got the idea to make these cuties from A Year of Many Firsts.  Click here to see how she uses them a bit differently. 


Then we hang them from the ceiling so we can reference them if needed.  We also add them to our interactive notebooks but I'll post about that when we work on it again this year so I can post some student samples for you.  I hope you enjoyed the Christmas in July sale.  Check back often or follow me to see more of my resources and future posts!

Saturday, July 19, 2014

Christmas in July:Part 2

For Part 2 of my Christmas in July Sale I will be discounting my #2 best selling item: Polka Dot Nameplates/Name Tags. 


Polka Dot Nameplates/Name tags

This Set comes in 10 different colors that you can use year after year!  To see my post on how I use them click here.  To pick them up while they are on sale click on the picture or link above.  I'll be back on Wednesday to post about part 3 of my Christmas in July sale so check back then!

Tuesday, July 15, 2014

Christmas in July: Part 1


I've decided to step up my blogging game and join in my first ever link-up.  EEK!! It's very intimidating linking up with such great TPT sellers and all of their amazing products when my store is still so small but I guess you have to start somewhere right?  I am linking up with all the amazing teachers over at Blog hoppin for a little christmas in July sale.  I don't have nearly as many products to offer as all the others so I decided to put my top 3 best sellers up for sale for 4 days each during the sale.  My first product up for sale is my #1 selling chevron nameplates/nametags.

Chevron Nameplates/Name tags
Here is a picture of the black and white version.  The file comes with 20 different colors so you can pick and choose the ones you want to use or use them all!

Here is a picture of my students desks from the first day of school last year with their name tags.  I have a colorful classroom so I use them all.
All you have to do is print and laminate and you're ready to go!  You can print them on card stock for added durability if you would like.  I usually just print them on plain paper and laminate them but that's mostly because I'm not sure if we're allowed to put card stock in the one and only color printer we have at school and I would hate to be the person to mess it up.  I don't like to tape them down to the students desk because I like them to be able to take them with them when they need to use the math helps on them.  In the past I just set them on their desks but they always get knocked on the floor and do usually need to be replaced half way through the year.  This year I am going to try Velcro on their desks so they won't fall off but will still be removable.  The best part about this purchase is that you can use these nameplates year after year unlike the ones you have to re-buy at the store every year.  To pick up these super cute nameplates while there on sale click on the picture or link above by Friday.  I'll be posting about my next sale item on Saturday so check back to see my other top selling items and pick them up on sale during this fun Christmas in July sale!  

Monday, July 7, 2014

2014-2015 Pacing Guide

Well hello again blogging world!  My goodness it has been a while since my last post.....AGAIN!  I just don't know how all you bloggers do it but I am trying hard to make it more of a habit.  I love sharing my ideas since I am constantly getting inspiration from so many other teachers but man it's hard to find the time to do it.  We'll give it another go this school year and see how I do.

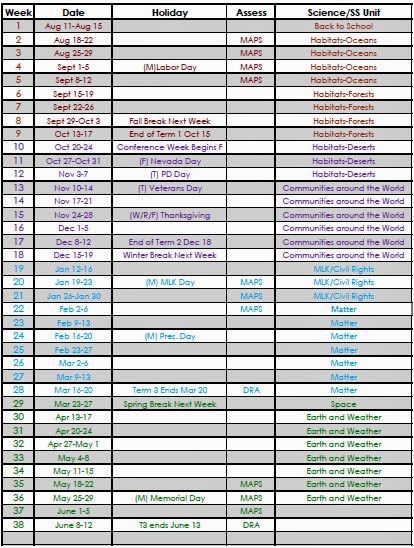
I just finished updating my grade levels pacing guide for the upcoming school year so I thought I would go ahead and share it with you all and tell you how we use it.  Here is what it looks like:

 This is a screen shot of the entire spreadsheet.

Here is a close up of one of the first page so you can get a better look at it.

My grade level team and I use this as a guide to pace out our year.  It is color coded by term and includes a column for the week #, Dates, Holidays, assessments, our science/social studies units, Phonic/Language Focus, Reading/Listening and Speaking Standards, Writing, and Math.  Our units are based off of the Next Generation Science Standards and our states social studies standards.  The Phonics/Language Focus Column is based off of  Houghton Mifflin Spelling.  We use the spelling that came with HM in my grade level, but have some differentiated lists we use that follow the same spelling patterns as HM.  When it is a review week or writer's workshop week and we have no phonics focus we cover other Language standards that we haven't hit and that don't get hit with our spelling lists.  The reading/listening and speaking columns are really just a guide.  We don't hit all those standards during the same week or at exactly the week it is listed on the pacing guide, but try to make sure we hit all the ones listed for each term by the end of the grading period so that we have consistent grades.  Usually we're focusing on the same standard at the same time but sometimes have to stagger ourselves so that we can share resources.  The math columns just got changed.  Next year my school voted to follow the Engage NY math curriculum so I went though the pacing guide that came with that and added it to the math column.  It is supposed to take exactly 180 days if you use every lesson, which is every day of the entire school year!  So ,obviously we will have to do some modifying along the way.  I'll post more about that as we work our way through the program this year.  I got the idea to create this pacing guide from a former 1st grade teacher that I worked with.  I love how it puts the pacing for every subject in one place, so much easier than looking at a bunch of different pacing guides.  I simply print it out, glue it together and hang it on the bulletin board above my desk for easy viewing.  I also have it saved on dropbox for easy viewing when I'm away from my desk (like when I'm doing my planning at home).  If you would like to modify this for your own classroom click here

Thursday, April 10, 2014

A Telling Time Anchor Chart

Oh my! It has been a long time since I have had any time to work on my blog or my classroom website.  Seriously I don't know how all you bloggers do it.  Between teaching full time and being a wife and mom I don't know how you find the time to do this regularly.  But I'm going to try really, really hard to get on here more often.  I thought I would start by getting a lot of the things I have already created for myself uploaded here and on TPT.  To start I am going to post about the Telling Time Anchor Chart I created.  I like to do a lot of activities where my students "coach" each other through problems.  They work in partners and take turns being the "coach" or "teacher" while the other partner is the student.  When it is there turn to be the "coach", they ask the questions that are posted on the board, or for this activity the anchor chart to guide their student through the problem they have been given.  I have a lot of  Evan Moore Take it to Your Seat Centers that I like to use for these coaching activities but hope to create my own task cards to go with them in the future.  For now, I just take the cards out of the center I want to use and spread them around my classroom.  Partners are sent to a task card and have to coach each other through the process to solve the problem.  When they are finished solving the problem they put their thumb in the air to signal that they are ready to rotate.  Then when they are all finished we rotate clockwise to the next task card.  I of course have to model for them how to help their partner when they have difficulty with a task instead of just telling them the correct answer but they usually get the hang of it and I walk around the room helping them as they go too.  To go with my Telling Time Anchor Chart I used a telling time center I had.  Each card had 4 clocks on it, 3 already had the hands on the clocks and the students had to read the time and 1 was missing the hands and the students had to draw the hands to match the digital time.  So for each card they each got to be the teacher and student two times.  I really like this activity because it is very student centered and because it helps the students practice explaining how to do something which helps deepen their understanding so both the coach and teacher are improving their skills at the same time.  Click the link below to grab this for free for today only!  After that it will only be $1.50 so don't worry if you didn't find it in time.  I hope you find it useful.  **Free for one more day (4/11/14) I just found and fixed a typo on the chart itself so I am going to extend the freebie period until the end of today.  If you downloaded it yesterday please re-download it**